Building a basic chatbot
Over the course of my previous semester of University, I had the fun experience of building a small deep learning-based chatbot for a university assignment. It was really fun to see it working and get it running, so I figured it would also be great to clean it up and deploy it on the internet.
You can check out the chatbot for yourself here! After initially visiting the site, wait a minute or two and try visiting it again - the chatbot takes about one or two minutes to start up (the tradeoff for having free hosting). Here’s an example of how it should work:

The repository containing the code for the site can be found here.
Basic Overview
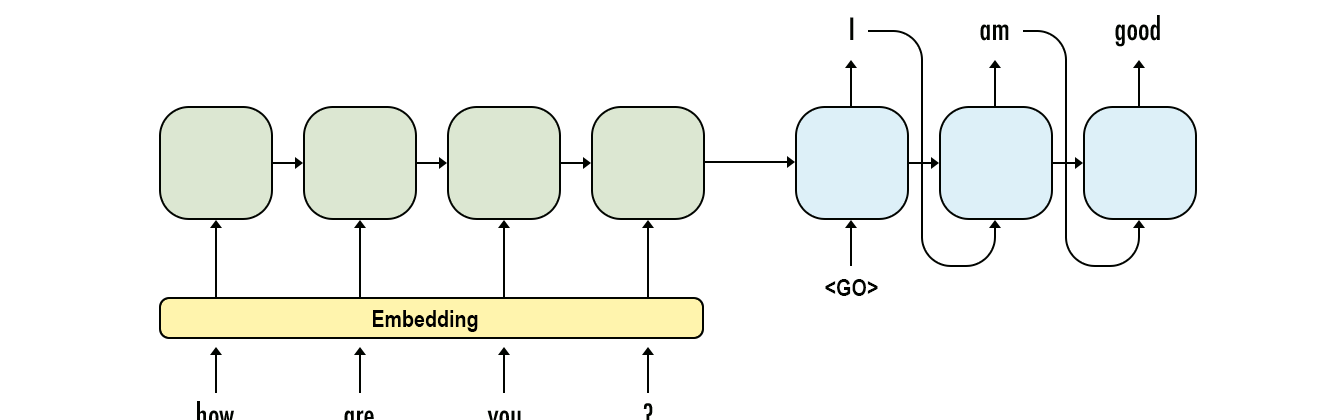
The chatbot is quite simple, using a very simple encoder-decoder architecture (see below if you don’t know what that is). First, it takes in the user’s input, passing the words (as word embeddings) into a layer of GRU units, which means it can take input of (more or less) arbitrary length. An attention mechanism is then applied to the output, determining which words in the input are most important for generating a response, and weighting the output values associated with each input word accordingly. Finally, this output and a ‘begin’ token are passed into another set of GRU units, which output a single number: the index of the best response in the list of possible responses. This is then used to look up and provide that chosen response. The image below summarises this:

Since the model is simple, each input is treated individually - it has no memory of previous questions. This made deploying the model easy (as it requires no memory, it is essentially stateless) but means it can’t hold a very human-like conversation. In addition, as the model is choosing the best answer from a list of prewritten ones, the second you start asking questions that are unlike its training data, it will give very odd responses. Sometimes this can be fun, though! 😄
Training Data
The dataset used for training and looking up answers was the Microsoft Personality Chat dataset, which is a fairly small dataset that comprises of common conversational patterns, mostly focussing on ‘chit-chat’. As part of the assignment, we used the ‘professional’, ‘friendly’, and ‘witty’ personality datasets (since the assignment more personalities have been added).
Encoder-Decoder Architecture
The encoder-decoder architecture is a common architecture used for neural network models in NLP (although, at time of writing, transformer architectures are quickly taking over the field). It consists of two basic units: the encoder and the decoder. The encoder’s job is to ‘encode’ the input - that is, to take in input and transform (or ‘encode’) it into a form useful for the task, while doing some analysis of the input. So it takes in two inputs: the previous state of the encoder (which allows it to retain the memory of previously happened in the input), and the current input (usually a word embedding). If it is the first word in the input, we just pass in all zeroes as the previous state. We thus feed in each word one by one, and at the final word get the output from the encoder and save it.
The decoder then, well, ‘decodes’ this output. It takes two inputs: the previous state of the decoder (so the model can remember what it has already said) and the previous output from the decoder (e.g. the previous response output). However, rather than setting the previous state to all 0s for the first step, we set it to the output state from the encoder after the encoder had processed the input. This allows the decoder to then ‘decode’ this and generate an appropriate response.
There are more additions we can make on top of this basic structure: we can ‘stack’ encoders and decoders, essentially just adding more layers to them. We can also, say, use bidirectional encoders: two encoders which get fed the input in opposite directions, allowing them to track different aspects of the input. The output states are then combined in some way (e.g. just adding them together). More recently, there are also attention mechanisms that can be applied. These mechanisms essentially take the output of the encoder at each step and weight it according to a given step’s importance to the decoder, modelling the idea of ‘attentiveness’. For example, the model (should) weight the encoder output for ‘name’ much more than any other word in the sentence ‘What’s your name?’, since it is the most crucial word for answering the question. If you’re interested, I recommend going out and reading up on the area, since NLP deep neural net architectures are currently a fast-moving and exciting space, in which a lot of new work is being done.
For my model, I used bidirectional encoders with a basic attention mechanism, using 256 gated recurrent units (GRU) for the encoder and decoder. Hence, my encoder looked something like this:

Hosting
Hosting this model was somewhat tricky. A simple ‘drag and drop’ of my assignment code, unfortunately, did not work due to the RAM requirements of word embeddings - using Gensim, a set of trained word vectors would take up gigabytes of RAM - far more than the modest 512 MB a free Heroku dyno gives you, nevermind that the saved weights file itself was at least a gigabyte, if not more. So I needed to find a way to load word embeddings without having to load them all at once, and in the best case not even have to upload the saved weights with it - and I found exactly what I needed in Magnitude. This library allows for remote streaming of pre-trained word embeddings, meaning that the word embeddings can be served from a file hosted by the library maintainers. It also supports partial loading of your own files, if you don’t want to use their pre-trained embeddings. While streaming the vectors slows the chatbot down on slow web connections (such as my own), when hosted (with a far better connection) it makes little difference, well worth the tradeoff and saving many, many gigabytes of RAM.
The website is hosted on Heroku, running within a dockerised container - see the code itself for the Dockerfile.
Conclusion
If you made it to the end of the post, thanks for reading - hopefully this post helps you with your own projects in some small way! 😄